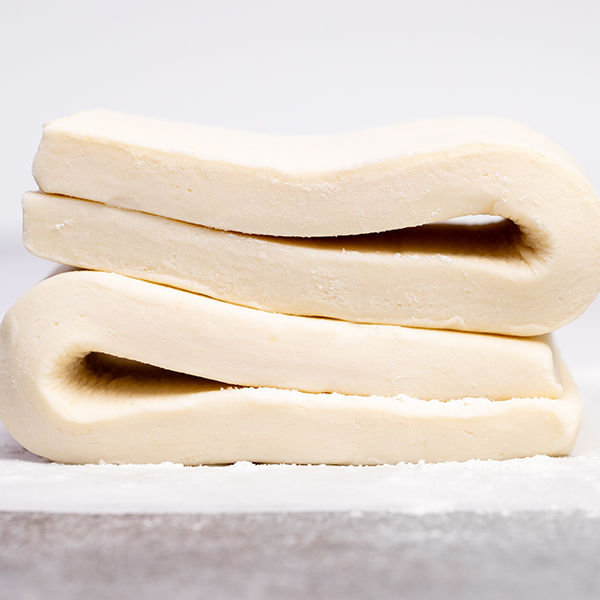
This gluten free puff pastry recipe makes buttery, flaky, elegant pastry. Learn the secrets to making it right the very first time!

Making gluten free puff pastry is all about keeping your ingredients cold, handling everything properly, and folding and rolling the dough the right away. If you’ve ever had trouble understanding the butter packet, or the “turns” that create all those flaky layers, this clear, step-by-step recipe is all you need.
What is gluten free puff pastry?
Puff pastry is a laminated dough with ultimately hundreds of layers of flour and butter that are kept cold until they go into the oven, where the butter expands and separates the layers of flour and produces that beautiful, delicious, elegant buttery flakiness. Gluten free puff pastry is the same laminated dough, with all the butter, flaky layers, made with gluten free flour in place of conventional flour.
Why this is the only gluten free puff pastry recipe you need
This gf puff pastry recipe is not only buttery and flaky, like any proper puff pastry would be. Of course, you can use it anywhere you might have ever thought to use puff pastry, conventional or gluten free. But that’s not all.
The recipe calls for only 4 ingredients (gluten free flour blend, butter, water, and salt) in exactly the right proportions—and this post provides a thorough explanation of how and why you make the magic happen. Your confidence that you can have this special pastry dough back in your life is in the details.
You can watch me make the dough in the video and try to mimic the technique, but once you understand why we take each step, perfect gf puff pastry will be second nature in no time.

Traditional gluten free puff pastry vs. gluten free rough puff pastry
This recipe is for traditional gluten free puff pastry using a cold butter packet that we wrap in a simple base gluten free pastry dough. It must be rolled and folded multiple times in what are called “turns,” and chilled after each set of 2 turns.
Rough puff pastry, also known as “quick puff pastry,” is made with a single pastry dough, rather than two parts, that contains large chunks of cold butter scattered throughout gluten free flour. It’s laminated, or rolled and folded in a similar fashion to how we make layered buttermilk biscuits.
Rough puff pastry creates lovely layers, too. It’s just a little less elegant and not too much easier than traditional puff pastry like this recipe, which produces almost infinite layers of flaky pastry.
How to make gluten free puff pastry
There are two parts to any puff pastry recipe: the base dough and the butter packet. The base dough is made of flour, butter, and water. The butter packet is made of butter and flour (but mostly butter).
You make each part separately, then combine them into a single dough. Finally, you roll out the dough and fold it over on itself a total of 6 times, chilling after each set of 2 rolling-and-folding sessions (each called a “turn”).
How to make the base dough for puff pastry
The base dough is what we use to encase the butter packet. The method is very similar to making pie crust.
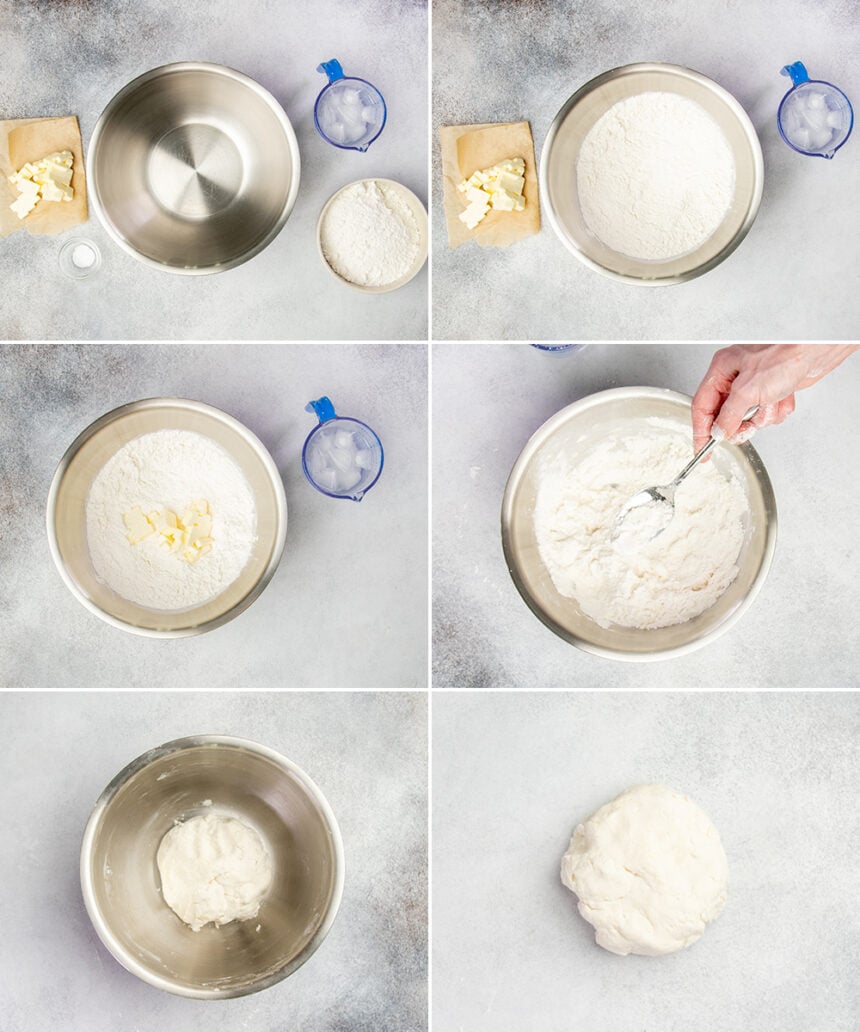
Begin by whisking together the all purpose gluten free flour blend and salt in a large mixing bowl. Add cold, chopped unsalted butter. Toss the butter in the flour, and then press each of the pieces of chopped butter flat between your thumb and forefinger.
You can also use a mixing spoon to flatten the butter by pressing it down against the side or bottom of the bowl. Do not attempt to crumble the butter so that the mixture is merely grainy or like sand. You want the butter to stay solid.
Add ice water to the mixture until it comes together. There shouldn’t be any crumbly bits, but the dough also should not be wet. Press the dough into a disk, wrap tightly, and refrigerate.
How to make the butter packet
The next task is to make the butter packet. It can be a little trickier since it does take a bit of practice, but as long as you understand what your goal is in the end, you’ll be able to adjust as you go along.
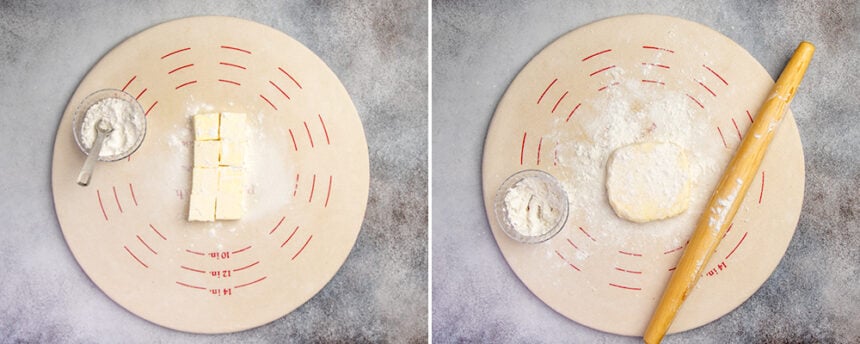
You’ll begin with 2 sticks of cold unsalted butter, each chopped into 4 chunks of 2 tablespoons each. Sprinkle some flour on a flat surface, then arrange the chunks of butter into a grid 2 chunks wide by 4 chunks.
Sprinkle the top with more flour, and begin to pound and roll the butter with the goal of flattening the grid and pressing the pats of butter together with one another. You want the butter packet to be cold, but pliable enough to fold over on itself at least once so you can press and roll it out into a 4-inch square.
The butter will warm as you handle it, and become a bit sticky. That’s to be expected. Just sprinkle lightly with more flour anywhere it becomes sticky and continue to work.
If the butter begins to feel greasy, cover it and refrigerate it until it firms up, then continue to shape it. When you have the proper shape, cover and refrigerate the packet until it feels firm but not hard.
How to combine the base dough and the butter packet
Once both the parts, the base dough and the butter packet, have been formed and refrigerated until firm but not hard, it’s time to combine them. The goal here is to layer the dough both above and below the butter for a stack of 3 layers, like a butter sandwich.
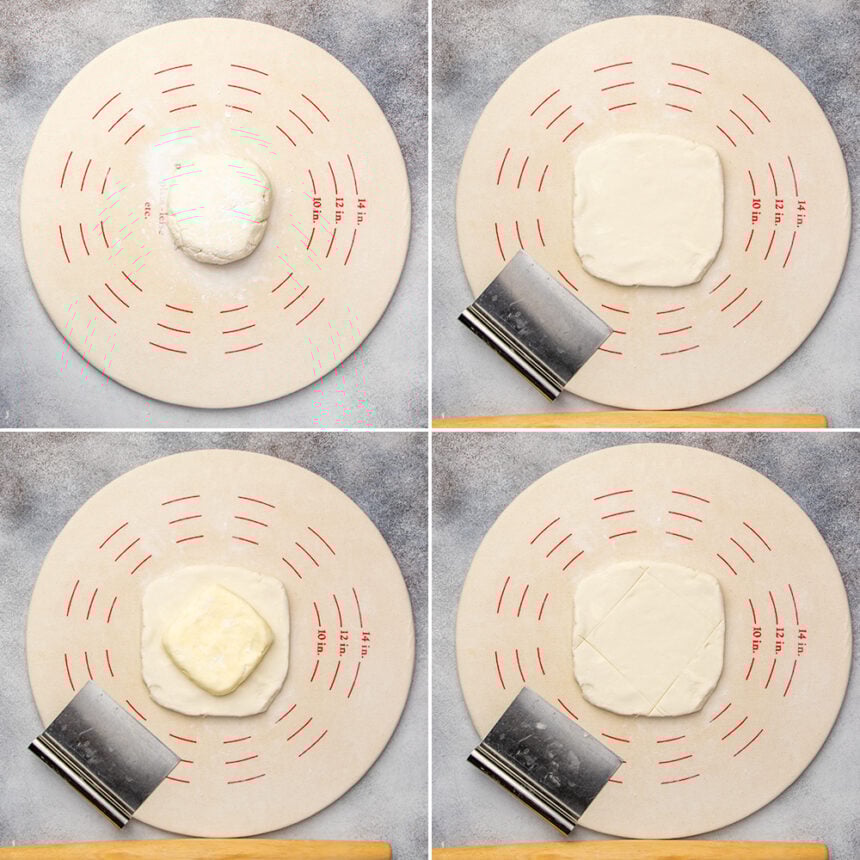
First, roll out the chilled base dough into an approximately 6-inch square. Then, place the butter packet on in the center, and use a sharp edge like a bench scraper or a knife to score the outlines of the butter packet on top of the dough.
Remove the butter packet to the side, and you’ll have a 6-inch square base dough with the outline of the butter packet in the center. It can make the next steps easier if you place and score the butter packet at a 45° angle to the base dough, as if it were a diamond on top of a square.
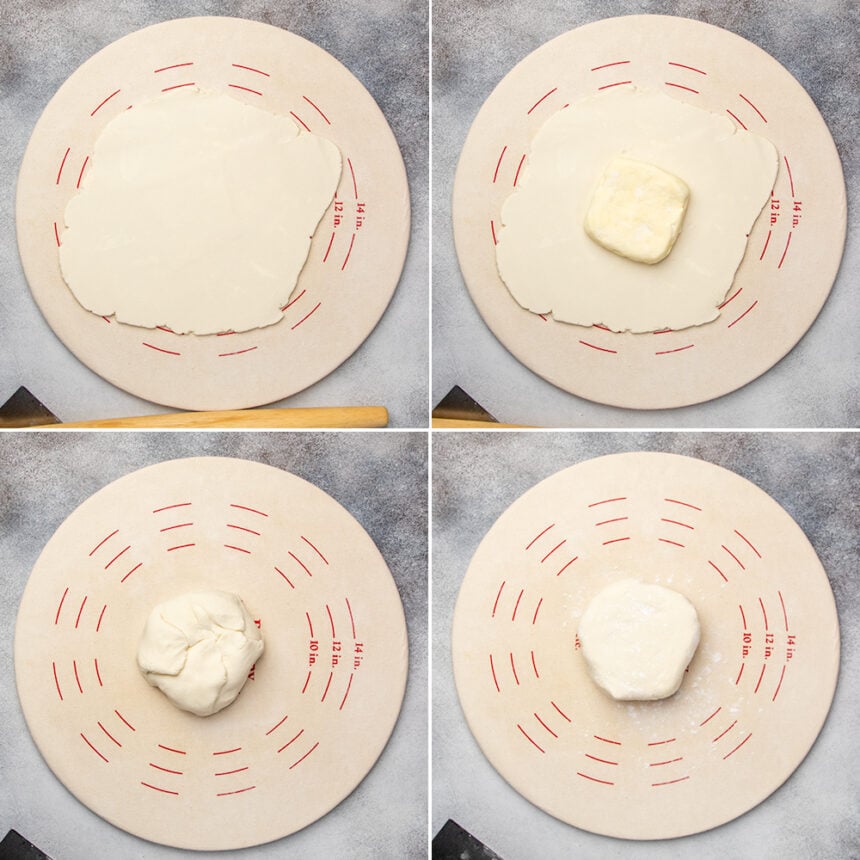
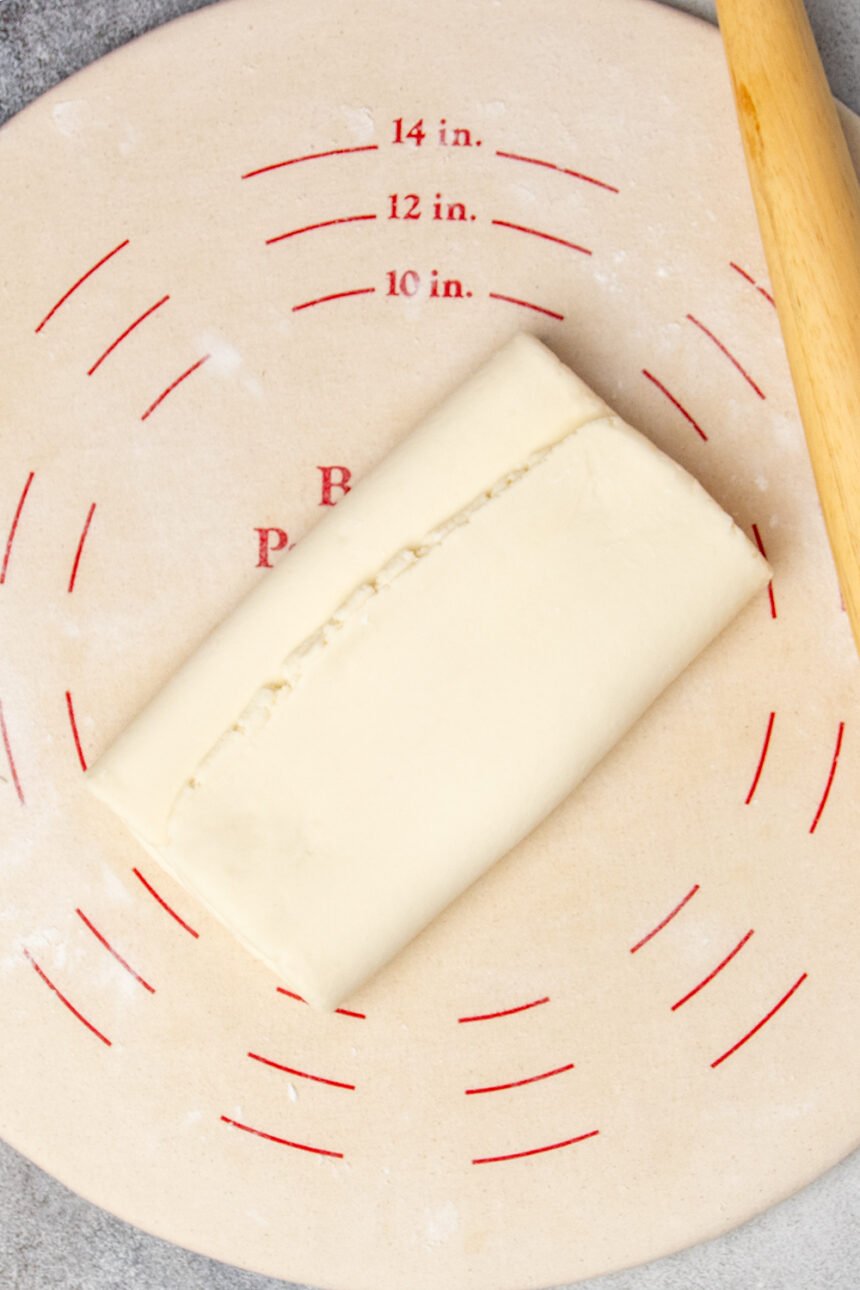
Next, roll out the 4 edges of the base dough from each of those score marks out, then place the butter packet back on top, again at that 45° angle. Use the rolled out dough to wrap it around the butter packet, fulling enclosing the butter in the dough. The flaps of base dough will overlap one another.
Whenever you’re rolling out the dough, either now or during the lamination (rolling and folding) process described below, keep it moving and sprinkle the surface, dough, and even rolling pin lightly with flour to prevent sticking.
How to laminate, or roll and fold, the puff pastry dough
The final step in the process is lamination, or the rolling and folding of the combined base dough and butter packet. This technique is what creates layers of alternating flour and dough that multiply as you go on.
Butter temperature remains very important throughout, since we don’t ever want the butter to melt into the dough. If the butter isn’t solid between the layers of dough, it won’t expand in the oven, which is what creates the flaky layers that make puff pastry so lovely.
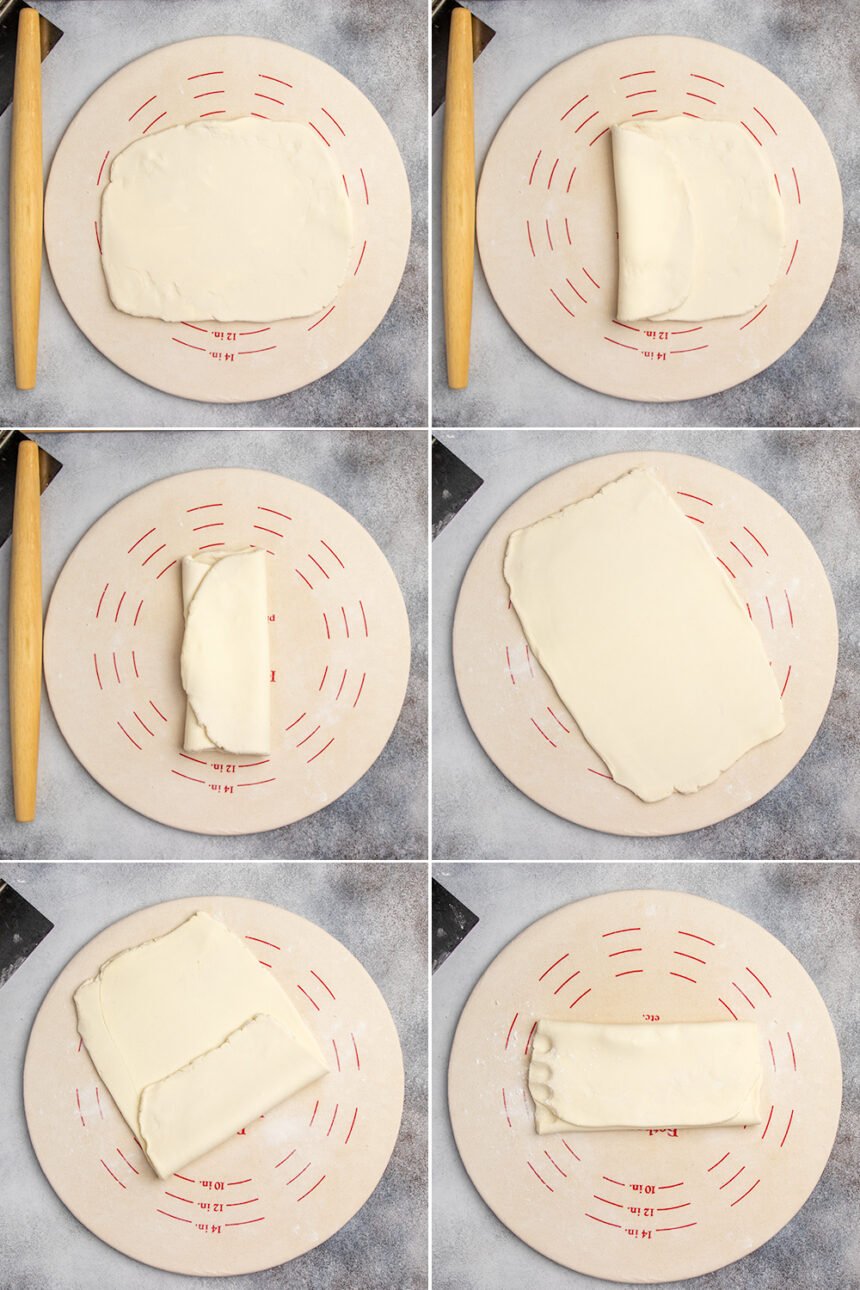
Each time you roll out the combined base dough and butter packet into a rectangle, then fold it on itself from both sides in thirds, as if it were a business letter, is called one “turn.” You can refrigerate the dough after each “turn” to ensure that the butter stays solid, but it’s just as effective to complete the turns in pairs and refrigerate for 30 minutes in between each set.
The total number of turns required to create hundreds of layers of dough and butter is 6. If those turns are completed in pairs, you’ll chill the combined dough for 30 minutes after turns 1 and 2, 30 minutes after 3 and 4, and 30 minutes more after turns 5 and 6. After the final 30 minutes, the dough should be rolled into whatever thickness you need to use the puff pastry.
If you don’t intend to use the puff pastry soon after the final “turn,” do not complete all 6 turns. Stop after the 4th turn, wrap the dough tightly and refrigerate it until about 1 hour before you’d like to use it. When you’re ready, remove the wrapped dough from the refrigerator, let it sit at room temperature for about 20 minutes or until you can roll it without the dough cracking, and proceed with the final 2 turns.
How to keep track of the number of turns completed
It’s easy to lose track of the number of turns that have been completed. The first two turns happen right after you’ve combined the base dough and butter packet, but after that it can get confusing. I find it’s very useful to mark the dough after each 2 turns with a floured knuckle with one mark for each of the completed turns.
So, after the first 2 turns, your dough will have 2 knuckle marks. After the second 2, 4 marks. That way, if you choose to complete the final 2 turns later, you won’t have to rely on perfect memory to be sure you’re not over-rolling.
What happens if you complete more than 6 turns?
After 6 turns, you’ll have literally hundreds of layers since the number of layers multiplies exponentially. At that point, there are diminishing returns from more lamination. The dough tends to get compressed and the butter layers too thin to actually expand in the oven. The dough will still be flaky, but much less so.
Tips for making perfect gluten free puff pastry
Keep the ingredients cold
In pastry-making, the butter is kept cold before going into the hot oven. Like ice, when butter is cold, it contracts or is made smaller. When it is heated quickly, like in an oven, it expands. When the butter is in many, many layers, and is surrounded on every side by the dough, it pushes out the dough and creates all those flaky layers we love.
Larger pieces of butter can warm, but once chilled will regain their original shape, rather than melting into the surrounding dough. If you try to shape the butter packet when the butter is rock solid, you’ll find it almost impossible to shape.
If you begin with slightly warmer butter in creating the packet, you can shape it as you like, and then chill it until it’s firm. It will then retain its proper shape during the rest of the shaping—and during baking.
How the layers of gf puff pastry multiply, and why they must be cold
After that first “turn,” the tripled dough is made up of 3 layers of butter surrounded in alternating fashion by 6 layers of dough. When the turns are repeated between 4 and 6 times, the layers multiply exponentially.
Troubleshooting gluten free puff pastry
If you’ve never made a so-called laminated pastry, gluten free or conventional, it can be very useful to have a few goals in mind as you read through the recipe and then begin your work. Here are some of those ideas:
Keep your gluten free puff pastry from cracking
Is your dough cracking either as you wrap it around the butter packet, or after the first turn? It’s too cold! Let it warm up just enough to make it pliable (but not so much that the butter melts)
How do deal with sticky gluten free pastry dough
This recipe begins with the absolute minimum amount of all purpose gluten free flour blends in both the gf pastry dough and the butter packet. As you roll the dough, you may find that some butter breaks through and is exposed. Just sprinkle lightly with more gf flour, and keep rolling!
What to do when you gf puff pastry is too hard to handle
You’ll find that the recipe calls for frequent refrigeration of the gf puff pastry dough after each step. If your dough is difficult to handle, you probably just rushed one of those steps, so pop the dough back in the refrigerator and begin again.
Making gluten free puff pastry in advance
Making puff pastry doesn’t require a ton of active time, but since first the 2 parts and then the assembled dough must be refrigerated multiple times during the process, it can overall be time consuming.
It’s useful to be able to make the dough ahead of time, and that can absolutely be done. It just requires some planning. Once you’ve finished all the turns, your gf puff pastry is ready to be used.
In my experience, rolled out and completed gluten free puff pastry doesn’t freeze well as it tends to crack when you finally work with it. In addition, you usually end up having to roll and fold it, essentially completing an extra turn or two, before you can roll it into its intended shape. That leads to compressed layers.
But you can still make puff pastry dough now even if you don’t plan to use it right away. There are two ways you can handle that:
Shape the puff pastry into its final form
If you know how you plan to use the puff pastry, complete all 6 turns, chill for 30 minutes, and then roll the dough into its final form. That might be a 5-inch square to be used to make an open tart. It might be as a turnover that you fill, seal, and freeze.
Wrap the shaped dough tightly and you can freeze it for about 3 months. Bake it from frozen, adding a couple minutes onto baking time.
Only complete 4 “turns”
If the dough has only been rolled and folded through the 4th turn, you can mark the number of turns in the dough, wrap it tightly and refrigerate it for about 5 days or freeze it for up to 3 months.
Then, when you’re nearly ready to use it, let it sit at room temperature until you can roll the dough smoothly, without cracks, and complete the final 2 turns. Refrigerate for 30 minutes, and roll the dough into its intended shape and bake it.

Gluten free puff pastry ingredient notes
Choosing the right gluten free flour blend
It’s understandable to think that a recipe that calls for an “all purpose gluten free flour” will work with any all purpose gluten free flour. Unfortunately, that is never the case, as some blends simply aren’t good. They can be poorly balanced, have gritty rice flour, or just other poor quality or unnecessary ingredients.
In this recipe, as in all my pastry recipes, you can use any of my recommended all purpose gf flour blends, namely Better Batter classic blend gluten free flour or Cup4Cup gluten free flour (or either of my “mock” blends of each). Cup4Cup works particularly well here, since it’s balanced most like a pastry flour itself.
I still get emails from readers who are very frustrated with a recipe, telling me they followed the recipe “to a T” and that it failed. They’re angry! But more often than not, they used a flour blend that just won’t work, like GFJules or Bob’s Red Mill gf blends.
Unsalted butter
Since butter is the star of the gluten free puff pastry show, reach for good quality butter whenever possible. Keep your butter cold, but not so cold that it has sharp edges.
The trick is never to let the butter actually melt or become greasy, but to work with it when it’s somewhat pliable. Then, when handling the butter and the dough begin to warm it up, the puff pastry dough goes back in the refrigerator to chill until firm again.
Water
To avoid any unpleasant tastes from your water, try using filtered water (not spring water and definitely not sparkling water). And make sure it’s been chilled with ice (but add the ice after you’ve measured the water, since the ice doesn’t count in the volume measurement).
The amount of ice water you’ll end up using depends on many factors, which is why I provide a range in the recipe. If you use a starchier blend, like Cup4Cup, or if the air in your kitchen is dry and/or cold, you may need a bit more water.
Always add water slowly, since you can always add more but you can’t take it out. If you do add too much water, you can rescue the dough by adding a bit more gluten free flour blend, but you don’t want to chase your tail by adding too much water, then too much flour as the ingredient ratios will change.
Gluten free puff pastry substitutions
Gluten free, dairy free puff pastry dough
If you’d like to try making this recipe dairy free, I suggest replacing the unsalted butter with vegan butter. Melt and Miyoko’s Kitchen are my favorite brands, but they are softer than butter so I can’t promise they’ll create the precise flaky layers we all love! Be sure not to use Cup4Cup if you need to be dairy-free, since it contains milk powder.
Gluten free, vegan puff pastry dough
If you replace the butter with a dairy free alternative, your gluten free puff pastry recipe will be vegan.
Gluten free puff pastry recipe ideas
In theory, it’s easy to imagine how to use your gluten free puff pastry. But it can be hard to decide what to do with all that beautiful pastry dough! Here are a few of my favorite puff pastry applications:
How to make gluten free apple turnovers with puff pastry
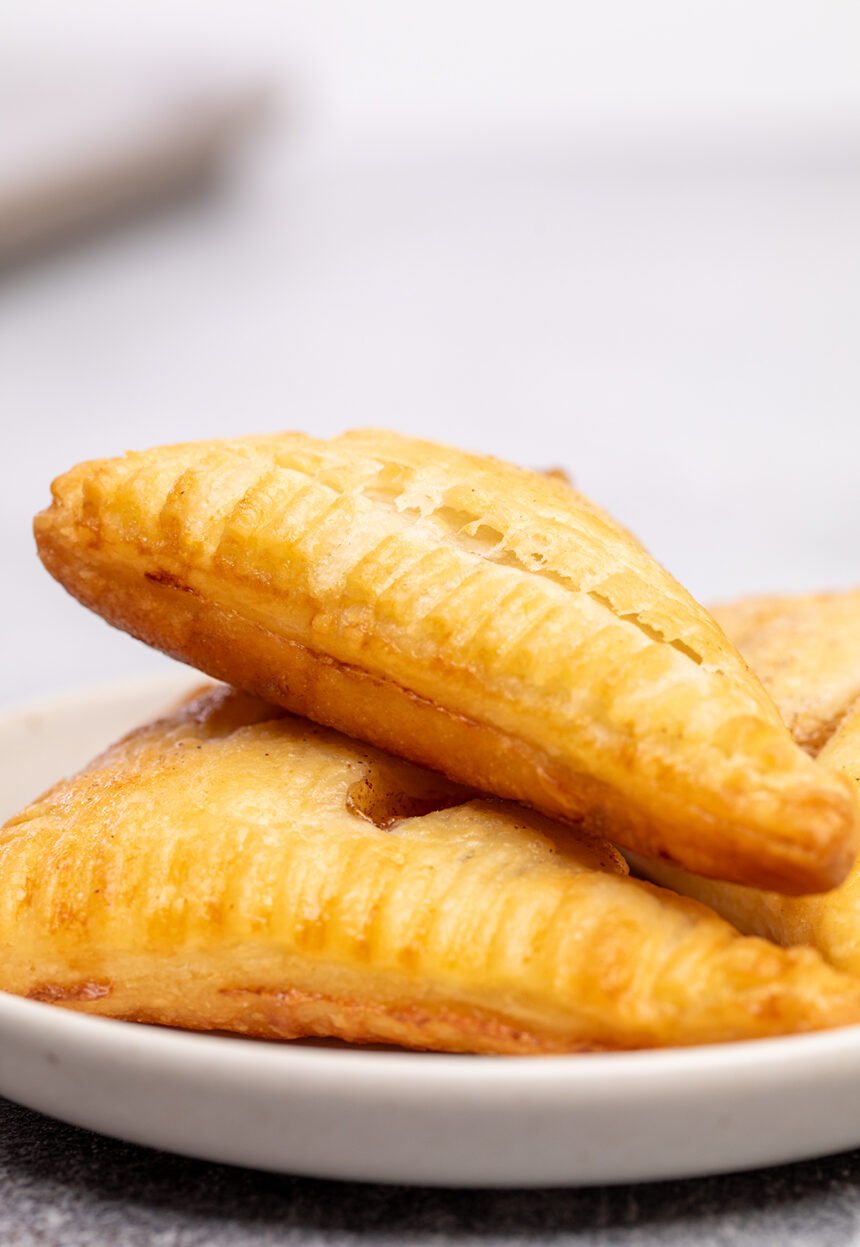
One of my favorite ways to use puff pastry is to make fruit turnovers, like the apple turnovers you see above. They’re light and flaky, and filled with cooked fruit filling that gets warm and gooey in the oven. They’re so good right out of the oven!
To make gluten free apple turnovers, roll out your prepared gluten free puff pastry dough into 5-inch squares (each about 1/4-inch thick). In the center of each square, leaving about 3/4-inch bare all the way around the perimeter, place about 1.5 tablespoons of prepared.
To prepare the apples, peel, core, and dice an apple. Place the diced apple in a small saucepan, add brown sugar, cinnamon and a splash of water to prevent the apples from burning, and cook it down on the stovetop until fork tender.
Brush the edges of the puff pastry square all around with egg wash. Then, turn the pastry over on itself like a triangle to encase the filling. Crimp all around the 2 flat edges of the triangle with the tines of a fork.
Refrigerate the raw filled and shaped turnovers for at least 20 minutes. Brush them all over with egg wash, and bake 20-25 minutes at 400°F until uniformly golden brown. Let cool briefly and enjoy!
Other possible uses for gluten free puff pastry
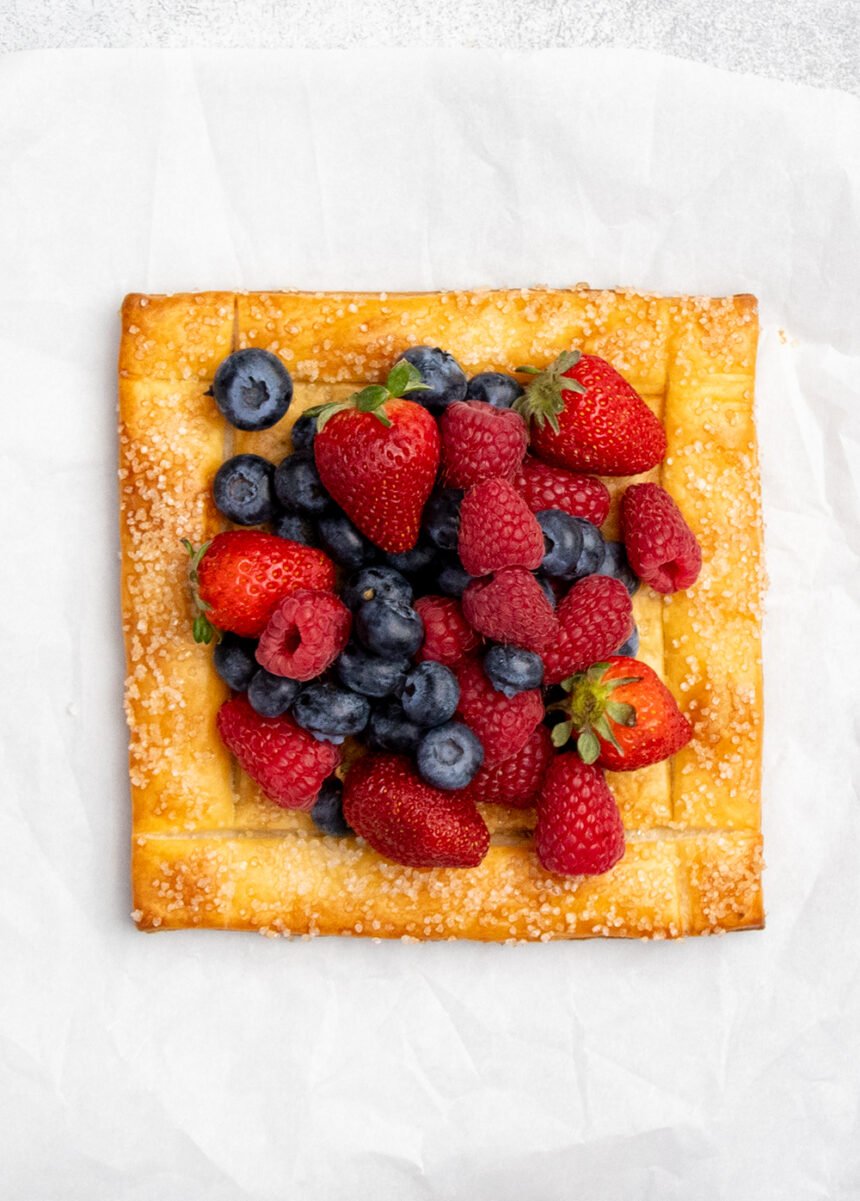
This recipe is perfect for everything from super easy sweet desserts, like the open apple tart you see in the photo above or as a pie crust replacement in our gluten free strawberry galette.
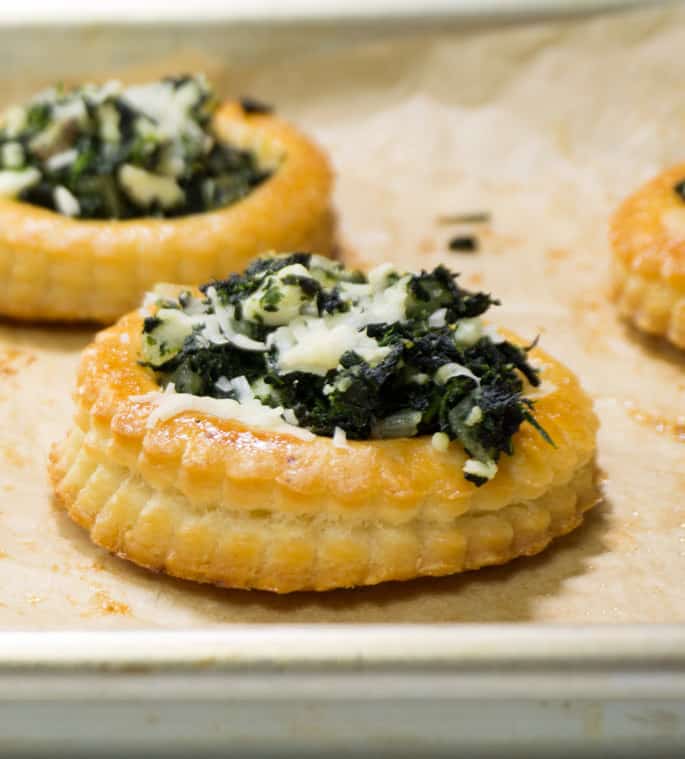
We’ve also made a gf asparagus tart with this beautiful, layered gf pastry dough. And it would be a perfect topping for gluten free chicken pot pie.
They’re also lovely just filled with pastry cream or whipped cream and some fresh berries, like an even more special strawberry shortcake.
FAQs
You can try using Miyoko’s Kitchen brand or Melt brand vegan butter in this recipe, but keep in mind that they’re softer than conventional butter, so they may not create the proper layered structure.
This recipe for puff pastry creates about 30% more puff pastry than the 2-sheet Pepperidge Farm puff pastry boxes that you may be familiar with from the grocery store. Each of those two sheets is about 9 ounces, and measures about 9.75-inches x 10.5-inches x ⅜-inch. This recipe will make 3 of those sheets, with that weight and size.
Yes, you can make only a portion of this recipe. To scale down the number of ingredients, just adjust the “yield” section in the recipe card below. However, the language of the recipe will not adjust accordingly, so you’ll have to use the size instructions as proportions.
For example, if you cut the recipe in half, you’ll roll out the base dough into a 3-inch square and the butter packet into a 2-inch square. You’ll cut the butter into 2 chunks and create a 2×2 grid to roll out. The architecture you are trying to create remains the same, which is part of why it’s so important to understand not only what we’re doing, by why we’re doing it.
Yes! There are two brands of gluten free puff pastry that I have seen in grocery stores: Schar Gluten-Free Puff Pastry, and GeeFree Puff Pastry Sheets. I haven’t tried any of them, though, so I don’t have an opinion about how good they are!
If your puff pastry isn’t rising into flaky layers in the oven, the butter most likely wasn’t properly distributed throughout the dough. That can happen for many reasons, but the most common is that the butter melted during preparation, so melted into the dough, rather than being layered alternately, and kept cold.
If it puffed but didn’t puff a lot, you may have completed more turns than 6, or completed all 6 turns and frozen or refrigerated the dough without using it and had to roll it out multiple times more to make it workable.
Puff pastry generally only becomes oily when the butter hasn’t remained solid during shaping. It will leak out as any recipe with too much warm butter would.
Yes! The easiest way to prepare gluten free puff pastry ahead of time is to shape it into its final shape, and freeze it as shaped. You can even fill and bake it right from frozen if it doesn’t have to be shaped again.
You can also complete the dough only through turn 4, then wrap it tightly and refrigerate or freeze the dough. When you’re nearly ready to use it, let the dough sit at room temperature until you can roll it without having it crack and complete the final 2 turns.
How to make gluten free puff pastry, step by step
Gluten Free Puff Pastry | Super Flaky Pastry Dough
This gluten free puff pastry recipe makes buttery, flaky, elegant pastry. Learn the secrets to making it right the very first time!
Yield: 1.75 pounds raw dough
Prevent your screen from going dark
Ingredients
For the base dough
- 2 cups (280 g) all purpose gluten free flour blend plus more for sprinkling (my Better Than Cup4Cup Flour work best here; click through for full detail on appropriate blends)
- 1 teaspoon xanthan gum omit if your blend already contains it
- ¾ teaspoon kosher salt
- 4 tablespoons (56 g) unsalted butter diced and kept cold
- ½ cup (4 fluid ounces) cold water iced (ice doesn’t count in volume measurement), plus more as necessary
For the butter packet
- 4 tablespoons (35 g) all purpose gluten free flour blend any of my recommended blends will do, with or without xanthan gum, plus more for sprinkling
- 16 tablespoons (224 g) unsalted butter very cold
Instructions
First, make the base dough.
-
In a large bowl, place the 2 cups flour and salt, and mix or whisk to combine well. Add the chopped unsalted butter and toss to combine. Press each chunk of butter flat between your thumb and forefinger.
-
Create a well in the dry ingredients, and add 1/2 cup of ice water to the center. Stir the mixture to combine. Add more ice water by the tablespoon until the dough stays together when pressed.
-
Press the dough into a ball, place it onto a piece of plastic wrap and wrap tightly. Place in the refrigerator to chill until firm while you make the butter packet.
Make the butter packet.
-
Dust a sheet of parchment paper or bare flat surface with 2 tablespoons of flour. Chop the two sticks of butter each by cross-section into 4 equal-sized chunks of 2 tablespoons each. You’ll have 8 pats of butter.
-
Arrange the pats of butter on top of the flour into 4 groups of 2 pats, touching one another, making a grid 2 wide by 4 tall. Sprinkle the butter with the remaining 2 tablespoons flour.
-
Using a French rolling pin, pound the butter to begin to flatten it and to press the pats of butter together. Press and roll the rolling pin until the pats join together and make one butter packet about 1/2-inch thick, sprinkling lightly with extra flour as necessary to prevent sticking.
-
If the butter starts to get greasy, sprinkle it lightly with flour, and refrigerate it until it firms up.
-
Fold the butter in half, and roll and pound it again until flat, and repeat the process until you have a butter packet that is about 4-inches square.
-
Wrap the butter packet tightly in plastic wrap and place it in the freezer to chill for about 5 minutes, or in the refrigerator for about 20 minutes, or until beginning to firm.
Combine base dough and butter packet.
-
Remove the chilled base dough from the refrigerator, and place it on a lightly floured surface. Sprinkle lightly with more flour, and press and roll the dough until it is smooth, folding it over on itself as necessary.
-
Press it into about a 6-inch round. Unwrap and place the chilled butter packet in the center of the round of dough.
-
Lightly score the perimeter of the butter packet, and set the butter packet aside.
-
Dust the top of the dough once more with flour, and roll out the dough from the 4 scoring marks and out, away from the center of the dough, to create 4 flaps.
-
Dust with more flour as necessary to prevent the rolling pin from sticking to the dough and move the dough frequently.
-
Place the butter packet back in the center of the dough, and fold the 4 flaps onto the butter like you would the bottom of a cardboard box. Press the dough around the butter packet to seal it in.
Complete “turns” 1 and 2.
-
Sprinkle the top of the dough with flour, and roll the dough away from you into a long rectangle that is about 5-inches wide x 12-inches long.
-
Whenever you’re handling the raw dough, sprinkle it lightly with flour to prevent sticking, and shift and turn the dough frequently. Starting at a short side, fold the rectangle in thirds as you would a business letter. This is the first “turn.”
-
You will do two turns at a time, and then wrap and refrigerate the dough in between.
-
Turn the dough 90° so the short side of the folded dough is facing you. Roll the dough away from you again into another long rectangle, in approximately the same size and shape as before (5 inches x 12 inches).
-
Fold in the same manner, once again, starting at a short side and folding in thirds like you would a business letter
-
You have just completed the first two “turns.” With a floured knuckle, make two impressions on the dough, to represent the completion of two turns.
-
Cover the dough with plastic wrap tightly and place in the refrigerator for at least 30 minutes.
Complete the 3rd & 4th turns.
-
Remove the chilled dough from the refrigerator. Unwrap it, and lightly flour the outside once again.
-
With a short side of the folded dough facing you, roll away from you and into a long rectangle the same size as before, about 5 inches wide x 12 inches long. This is turn #3.
-
Turn the dough 90° so the short side of the folded dough is facing you. Sprinkle the dough lightly with extra flour if any spots become sticky. Roll the dough away from you again into another long rectangle, in approximately the same size and shape as before (5 inches x 12 inches).
-
Fold in the same manner, once again, starting at a short side and folding in thirds like you would a business letter.
-
You have just completed the second two “turns” (numbers 3 and 4). With a floured knuckle, make four impressions on the dough, to represent the completion of 4 turns in total so far.
-
Cover the dough with plastic wrap tightly and place in the refrigerator for at least 30 minutes.
-
If you plan to use the dough today, continue on to the final steps of preparation. If not, keep the dough, wrapped very tightly, in the refrigerator until about 1 hour before you’d like to use it. When you’re ready, remove the wrapped dough from the refrigerator, and resume the recipe as instructed below.
Complete the final 2 turns (#5 and #6).
-
Remove the chilled dough from the refrigerator. If the dough is too stiff to roll, allow it to sit at room temperature for 15 to 20 minutes. When it’s ready, unwrap it, and lightly flour the outside once again.
-
Turn the dough 90° so the short side of the folded dough is facing you. Sprinkle the dough lightly with extra flour if any spots become sticky. Roll the dough away from you again into another long rectangle, in approximately the same size and shape as before (5 inches x 12 inches).
-
Fold in the same manner as before, starting at a short side and folding in thirds like you would a business letter. This is turn #5.
-
One final time, turn the dough 90° so the short side of the folded dough is facing you. Sprinkle the dough lightly with extra flour if any spots become sticky. Roll the dough away from you again into a final long rectangle, in approximately the same size and shape as before (5 inches x 12 inches).
-
Fold in the same manner as before, starting at a short side and folding in thirds like you would a business letter. You have completely the final turn.
-
Wrap tightly and refrigerate for at least another 30 minutes.
-
It is now ready to be rolled out and used in any recipe that you would otherwise use conventional puff pastry. This full recipe makes the equivalent of about 3 sheets of conventional frozen packaged puff pastry.
Notes
Nutrition information is per pound of puff pastry dough, and is for informational purposes only. It should not be relied upon for medical or any other important purposes.
Nutrition
Calories: 1281kcal | Carbohydrates: 30g | Protein: 3g | Fat: 130g | Saturated Fat: 82g | Polyunsaturated Fat: 5g | Monounsaturated Fat: 34g | Trans Fat: 5g | Cholesterol: 344mg | Sodium: 1087mg | Potassium: 44mg | Fiber: 2g | Sugar: 0.1g | Vitamin A: 3998IU | Calcium: 41mg | Iron: 0.03mg

Comments are closed.